Sunday, May 3, 2009

Building a Bog Garden

We tend to do our really hard projects here at Draco in the cooler months. Also, some projects require planning, plotting, scheming, logistics study, and budget analysis. Well, there may be some procrastination in there too. I mean who can get pumped up about digging in the hard ground and lifting big rocks? We made up our minds that we needed a bog garden. They can work like natural filters for your pond system and a place for plants that fall between "in the water plants" and "out of the water plants." After going on the Austin Pond Society Pond Tour again last year and talking to people about their bogs, we knew we wanted one too. [Damn, that pond tour.] I wanted to improve on the filtering capabilities of the bog even more than the ones I had seen. I studied several filter systems and decided I wanted one that the water would rise through the filtering medium and then run over gravel in the rest of the bog before it reentered the pond system.

The Pond Queen approved the plan and budget. The budget was less than twenty dollars as we had a piece of liner and gravel left over from previous projects and I picked up the rocks at a friend's ranch. Only things to buy were PVC pipe and fittings. Let the work begin.

You can't have a pond without a hole. Thank goodness it was in the only place that has any dirt on the entire place. Oh, but there were tree roots. As you can see in this picture, there is the main, big hole and there is a trough. The trough is where the pipe with holes in it will be laid. The gray stuff is mortar mix, the kind you buy in a bag. The mortar mix is used to form over dirt that wants to fall away and not stay to the right shape.


The liner is laid now. You can see a bulge where the tree root is. Don't cut any big roots if you don't absolutely have to. The PVC is plumbed. The part in the trench has holes drilled along its length. The PVC comes from the pump at the far end of our big pond over sixty feet away. The dirt is added before the gravel goes in. We will have plants growing in there to help filter.


This is not a quickie project and takes considerable planning. It needed to be higher than the other ponds, if only a few inches. The wall on the trench had to be a few inches below the outside perimeter. The number and size of the holes had to equal or exceed the area of the PVC supply line. And of course you need to have some place to put the dirt you take out to have a hole. Here the Pond Queen is taking the spoils to parts of the garden that could use it.


Here the gravel has been added, a few plants are in, it's been tested, and the rocks are laid out to start bordering it for the final look. Of course final looks are not when you complete it, but when it has matured a bit and gets away from that just finished look.


This is closer to the finished look. The water bubbles up through the gravel, runs across more gravel and around plants and over the little falls and back into the pond system.


These kinds of projects are great to do yourself. It doesn't take any skills that can't be learned from books or on the computer. They aren't meant to be fast, so you can take your time, enjoy the planning, the scheming, and the challenge. Plus you really have something beautiful that you will enjoy for a long time. My greatest thrill is in the planning and gathering the materials. I am a real scrounge when it comes to our projects. That's why this whole project cost less than $20. But then I had to load rocks out of the San Gabriel river on a friend's ranch and haul them home in my little Toyota pick up. My wife, the Pond Queen, dug almost the entire hole by herself. I have no idea how much this project would cost to do it professionally but I'm sure it would be a whole lot more than $20.

Coming soon we will build a new section of rock walk way. And we will be using some big rocks. Also in the near future we will be getting into what may be the biggest project, other than building the house, that we have done here at Draco. It's all just a bunch of good clean work. But, there is always something to look back at when you're done. That and it's a lot better than exercising to stay in shape.

Friday, May 1, 2009

Nopalito in Bloom

I've always been a fan of cactus. Most cacti are like irises, not much for looks for fifty weeks of the year and two weeks of blooms. That's why I really don't care much for irises. My big Nopalito cactus is an exception though. It's just starting to bloom and will have some blooms on it the rest of the summer. The first flush is the best. It will cover up in big, waxy, yellow blooms. Those blooms will draw many kinds of beetles and bees to them. The blooms have no odor that I can detect so I would suspect that they are drawn by color. The yellow of the blooms is a pale but pure yellow, much like Calylophus or Fluttermills. Here is a series of pictures showing how beautiful Nopalito blooms are start to finish.

Here is a bud just starting to grow. Click picture to view full size, it's just stunning.


This one is a little more developed.

This one is about to make the big show.


A bloom just opened up and a bee is in it immediately. The bugs really like these blooms.


It looks like I'm in for one heck of a show.


And of course I will be getting plenty of these.


Where it grows more pads instead of blooms, these little clusters come up. I can only imagine the picture that East Side Patch would have beside this.


It looks like there will be plenty of new pads this year as well.


Friday, April 24, 2009

Little Owls

As gardeners we must always consider the wildlife around us. It's always there whether we are dealing with it trying to destroy our gardens or enjoying it because we have made our little piece of the planet a little better for it.

And retailers are always coming out with new products to get our money because they know we deal with nature or enjoy it. I look at some new products and just have to wonder if it will work or not. Well here's one you don't have to worry about whether it works or not. You can buy these or you can build them with only basic carpenter skills. It is the owl house for the little Screech Owls. My brother-in-law, Michael, built this one several years ago and put it in his back yard. The owls were in it almost immediately and have come back every year since and have raised a brood every year. These pictures were taken with a game camera set in an adjacent tree. This is the same camera I was able to catch photos of the coons that were getting into my bird seed that was in an earlier post.

He sent me a lot of pictures and it appears that Screech Owls just sit at the entrance a lot.

Here you can see one's wing as it flew right in front of the camera.


Here the male has brought a lizard or frog and is tearing it up for the little female.

Monday, April 6, 2009

Freeze tonight

It looks like we are going to get a freeze tonight. It is supposed to be right at freezing in Austin and we are usually a few degrees lower than they are. Being a long time gardener, you learn to deal with it. I have saved large pieces of plastic and wraps for bundled material, so that I can cover the beds of row type crops. I use buckets and flower pots for the individual plants like tomatoes and peppers. You can't forget to put a rock over the hole in the pot though.
So come on frost, I am so ready.

Saturday, April 4, 2009

Lady Monster


I was in Liberty Hill this week and remembered to take a picture of a Lady Banksia rose that I look for every year at bloom time. It is a monster, climbing completely over an old house. It is so thick you can't even see the house except for the very peak. There are blooms numbering, literally in the thousands. If you get up this way you can see it right across the tracks from the Hobo Depot cafe in the middle of town.

Saturday, March 21, 2009

The Spanish Dagger blooms

Twelve days ago Lyn came in to tell me the Spanish Dagger at the property corner was starting to bloom. I had dug this plant up on the Marshal Ranch close to Lago Vista about ten years ago. I had asked Mr. Marshal if it was okay and he said to take as many as I wanted. I dug up two little ones about a foot in diameter, getting a goodly amount of roots with both. I planted one along the driveway and the other a few feet away from a corner marker of our property. As there is no fence on that side I thought it would always let me know where the pin was located. The property next door has been surveyed twice since then. Both times I've been lucky enough to see them start working. I told them where the pin was to save them time looking and gave further instructions to not hack my Dagger as by then it had gotten much larger.

In only ten years the Dagger has grown to over ten feet high, and is over eight feet wide and has developed two heads. I've never tried to trim it or make it look nicer like some do. It can't be seen from the house but I always like to see it bloom. It can be quite spectacular.

Here is a picture of the bloom head just twelve days ago.


Four days later.


Four more days later.


And finally, today.


Saturday, March 7, 2009

My NPSOT garden tour

This past weekend the Williamson Co. chapter of the Native Plant Society came to tour my gardens and take a stroll on the Army Corp of Engineers land that is just through my back gate. I really didn't have much blooming in my gardens yet, just the trailing Rosemary and a few Iris. However, they were very interested in the combos of natives and non-natives in the garden as well as all the rock work my wife and I have done around our ponds and gardens.


Our walk through the woods on the Corp land did turn up some early bloomers as well as other points of interest. It was a good time and I learned some new things about several plants. There are some very knowledgeable people on native plants in the club.


Monday, March 2, 2009

Nice solution for a sticky subject

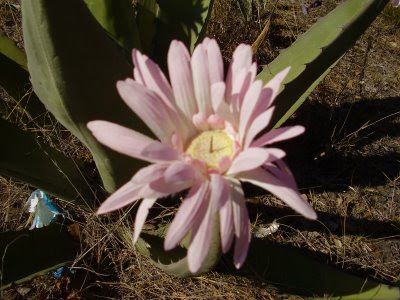
I was driving on CR 200 just north of Liberty Hill a few days ago and spied some big blooms at a driveway entrance. I knew nothing should be blooming of that magnitude now so I just had to turn around and check it out. It turned out to be a rather artsy way of dealing with Century Plant thorns close to where the kids wait for the school bus. I've never cared for the way some people plant an Agave or a Yucca and then lop off the thorns so no one will get stuck. It just makes the plant look bad. It seems they should have planted it elsewhere.

These looked like they should have been on my Sisters street in south Austin as they just have that south Austin flair to them. Very innovative.